
之前写过一篇类似的文章操作说明。原文章传送门→利用公众号的模板消息把评论/留言推送到微信
但是我觉得,太麻烦了(改的多,插件也多)。正好换了主题,插件全部卸载了,需要什么再重新安装。微信推送评论只需要一个插件CommentToMail+代码重改即可实现。
CommentToMail这个插件应该是大多数Typecho博主都会安装的必备之一吧。
最终通过4步,马上就能和邮箱同步收到评论消息推送啦!
申请公众号
特别说明:个人公众号目前已不支持模板消息。所以咱们申请测试公众号。测试公众号真的是简单又方便。
- 点击微信公众号测试号 申请。
- 填写
JS接口安全域名。就是你的博客地址。 - 配置模板消息。如下:
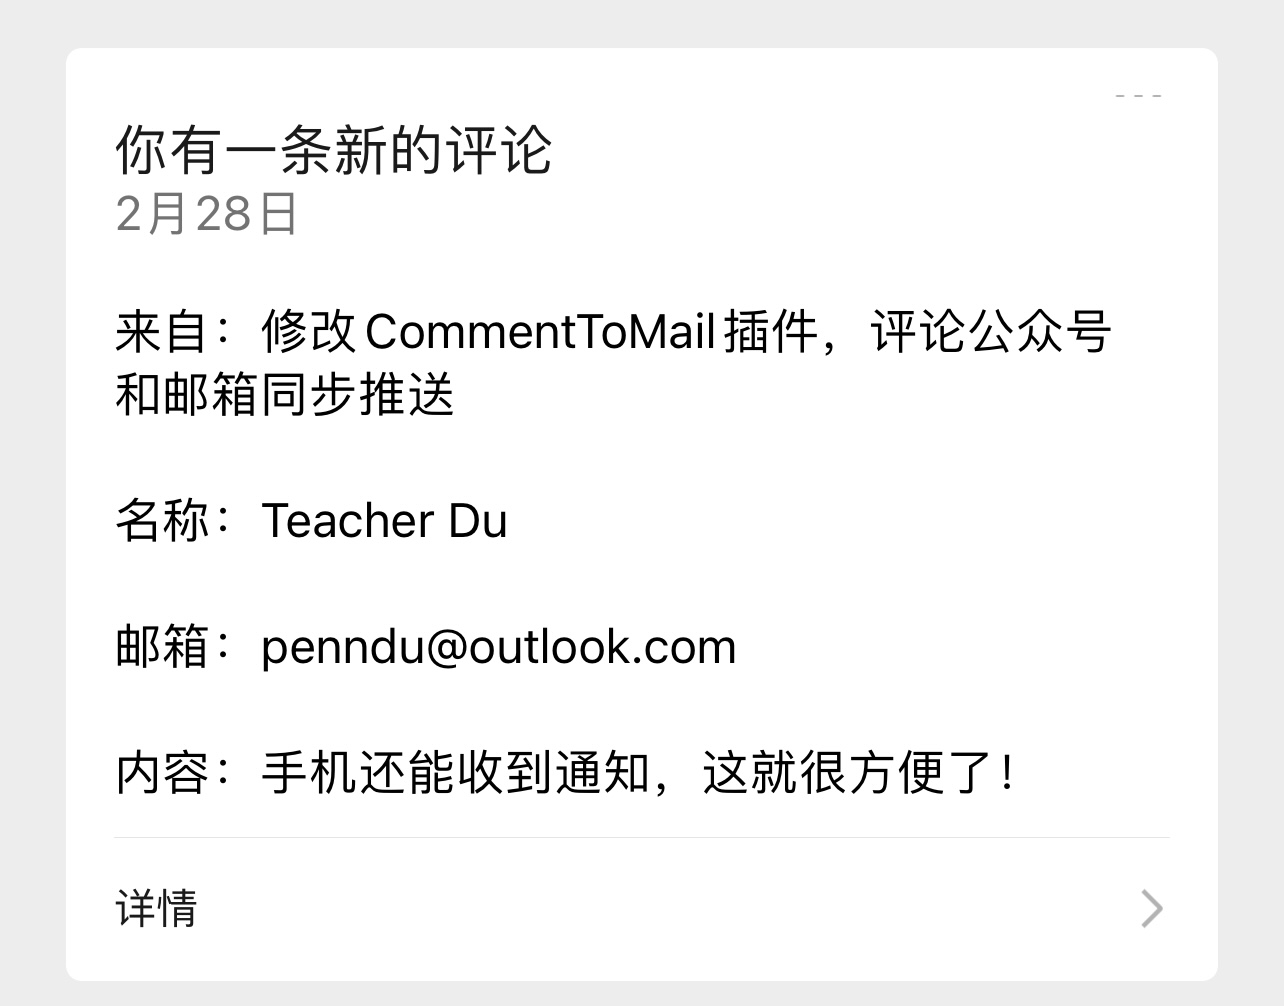
来自:{{title.DATA}}
名称:{{name.DATA}}
邮箱:{{email.DATA}}
内容:{{content.DATA}}- 记录下你的appID、appsecret、微信号openid、模板ID
插件安装
自行安装或者已安装的略过。未安装的可用下面云盘下载。
链接: https://pan.baidu.com/s/17AY1vE62eiI2OnWR0kAY0w
密码: ovps
代码修改
- 打开插件目录
/usr/plugins/CommentToMail,编辑Action.php文件 - 在最下方,最后一个
}前面,增加一下代码
/**
* 功能:获取access_token
*
* @param $code
* @return mixed
*/
public function get_access_token($config)
{
    $appid = $config['app_id'];
    $appsecret = $config['secret'];
    $url = 'https://api.weixin.qq.com/cgi-bin/token?grant_type=client_credential&appid='.$appid.'&secret='.$appsecret;
    $data = json_decode($this->http_GET($url));
    if($data->errcode){
        return '';
    }
    return $data->access_token;
}

// 发送模板消息
public function send_template($mailInfo,$config,$openid,$access_token){
    $url = 'https://api.weixin.qq.com/cgi-bin/message/template/send?access_token='.$access_token;
    //定义消息模板JSON
    $json_template = $this->json_tempalte($openid, $config['template_id'],$mailInfo->permalink,$mailInfo->title,$mailInfo->author,$mailInfo->mail,$mailInfo->text);
    //发送POST请求
    list($returnCode, $returnContent) = $this->http_post_json($url, $json_template);
    //打印日志(JSON格式)
    echo '发送结果如下:' . $returnContent . '\n';
//   return '1';
}

//模板消息JSON格式化
public function json_tempalte($openid, $template_id, $url, $title, $name, $email, $content)
{
    //内容格式化
    $content = strip_tags($content);
    //模板消息
    $template = array(
        'touser' => $openid,
        'template_id' => $template_id,
        'topcolor' => "#FF0000",
        'url' => $url,
        'data' => array(
            'title' => array('value' => $title, 'color' => "#000000"),
            'name' => array('value' => $name, 'color' => '#000000'),
            'email' => array('value' => $email, 'color' => '#000000'),
            'content' => array('value' => $content, 'color' => '#000000'),
        )
    );
    $json_template = json_encode($template);
    return $json_template;
}

//发送POST请求
public function http_post_json($url, $jsonStr)
{

    $ch = curl_init();
    curl_setopt($ch, CURLOPT_POST, 1);
    curl_setopt($ch, CURLOPT_URL, $url);
    curl_setopt($ch, CURLOPT_POSTFIELDS, $jsonStr);
    curl_setopt($ch, CURLOPT_RETURNTRANSFER, 1);
    curl_setopt($ch, CURLOPT_HTTPHEADER, array(
            'Content-Type: application/json; charset=utf-8',
            'Content-Length: ' . strlen($jsonStr)
        )
    );
    $response = curl_exec($ch);
    $httpCode = curl_getinfo($ch, CURLINFO_HTTP_CODE);
    curl_close($ch);

    return array($httpCode, $response);
}

//发送GET请求
public function http_GET($url)
{

    $ch = curl_init();
    curl_setopt($ch, CURLOPT_URL, $url);
    curl_setopt($ch, CURLOPT_RETURNTRANSFER, 1);

    $response = curl_exec($ch);
    $httpCode = curl_getinfo($ch, CURLINFO_HTTP_CODE);
    curl_close($ch);

    return $response;
}- 上方代码搜索
$log .= "向博主发信";。在下面增加以下代码:
//向博主发微信
$config = array(
    'app_id'=> '你的app_id',
    'secret'=> '你的secret',
    'template_id'=> '你的模板ID'
);
$openid = '你的openid';
$access_token = $this->get_access_token($config);
$this->send_template($mailInfo,$config,$openid,$access_token);
微信的4个配置参数,其实也可以添加到后台设置外观处,我懒得改了。
完工
这样就大功告成了,快去测试吧!
手机还能收到通知,这就很方便了!
@Teacher Du : 必须滴。邮件不经常看。微信是随时看。
是要执行监控的版本吗?
@海角七号 : 是的。按CommentToMail的配置来就行。如果你能收到邮件就本身没问题。
如果是网盘安装,就在服务器上加个定时任务。宝塔的话,添加计划任务。
牛逼呀!还改插件
@大湿兄 : 菜鸟瞎改。举一反三,举二反六。